
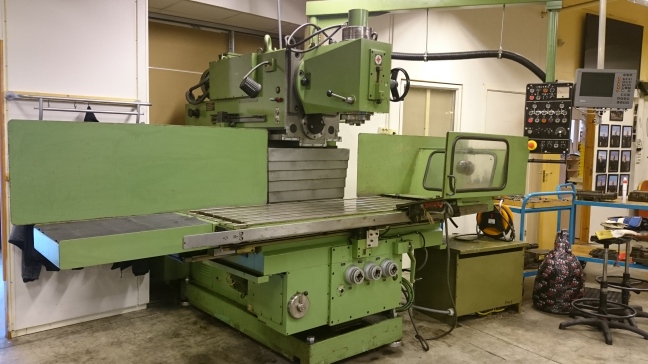
During my summer job at STM Engineering, I have had alot of various work. The company specialises in CNC machining of components for the industry, but do have some manual machines too. It is often easier to use manual machines on small work that is not series production. The biggest manual machine in the factory was an 1996 Tos Kurim FGS 50/63 heavy duty mill from Chekoslovakia. These kind of machines is big, powerful and sturdy. Just like any other old stuff that is made to last for ages. However, the control unit had some problems, and I was up for the task to fix it.
First problem with the machine was that the control voltage rails was shorted. I started tracing the short circuit, and ended up at a oil pressure switch on the hydraulic unit. In the image on the bottom left you can see the pressure switch itself. It can be adjusted to give a signal at a specific pressure level with a screw.


According to the manual, the pressure switch should be active at about 4 bars of pressure. I made a little tool to mount the thing to the air system in the workshop so I could test the unit. The thing was totally dead, and even at 7 bar’s of pressure there was no signal. However, pressing a pin into the inlet hole would give the signal. I also opened up the thing to see how it worked and I found that there was a hole in the diaphragm. And the reason for the short circuit in the system was that there was a hole too in the insulator plate, connecting the contact plate to the metal housing! Current would then enter the valve-block, wich is grounded.


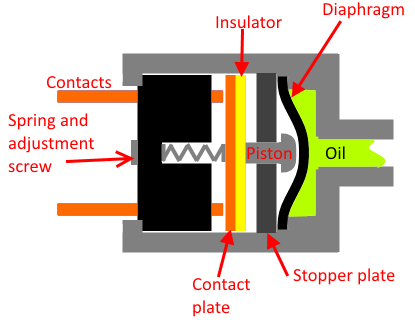
The unit is quite simple in its workings, a diaphragm pushes a piston that pushes the contact plate. The insulator stop current going from the contact plate through the piston and into the stopper plate and then the main body. The stopper plate will stop the piston from breaking the contacts when the pressure is very high (60Bar+) Here is an view on how the thing works.
Some new pressure sensors was found at RS Components at a fair price with fast delivery. However we needed to make an adapter since the threads was not the same, this was not difficult in a CNC Lathe. I used the same tool i made before to calibrate the units with air pressure.


The new sensors fixed the short circuit, but the mill was still not working. A big job was in front of me, cleaning all the contacts on the contactor relays! Yes, for some reason the contacts was very bad measuring with the multimeter. There are probably a thousand induvidual contact to be cleaned, but the CRC Contact Cleaner did the job very well!


In the next set of pictures you can see half of the contacts fromom only one row of relays, the other half of the contacts is inside the relays. Spraying and cleaning all the contacts with contact cleaner and q-tip gave good results. Some of the more worn and black contacts was polished on a rotating wheel.


Another issue was that some flyback arrester on six of the most used contactor coils was dead. They consisted of a resistor in series with a capacitor, connected in paralell with the contactor coil. I replaced the capacitors with a flyback diode instead, they do not age as capacitors tend to. The flyback arrester eliminates the reverse current coming from the coils when deactivated. The flyback current can wear out contacts, and interfere with sensitive electronics such as the digital readout.


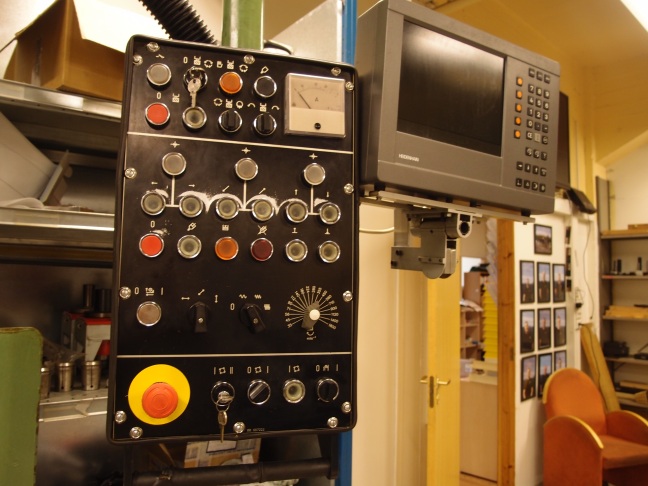
This fix made the thing work atleast somewhat better than before, with the speed control for the spindle and the lights on the control panel woring. However there was still some problems, such as the electromagnetic valves locking in the engaged position. These electromagnetic valves is used to deliver oil pressure to the electromagnetic braking for the axes. I measured on the control-vaoltage rails, and between two points on the zero volt line I found that there was a difference of about 6 volts. This voltage would send a reverse current throug the electromagnetic valves and contactor coils. This is not enough to activate them, but enough to prevent them from returning from the activated position.
After some hours troubleshooting, I found that a wire going to one of the relays was burned. I think the last person to install it did not torque the screw, heating the thing when current went through the bad contact. Fixing this totally changed everything, and now the mill works flawlessly! A funny fact that my boss told me was that four other experts had unsuccessfully tried to repair this machine!


Here are some other various pictures from the process, note the authentic blueprints!
And another slideshow from other things I have been working on this summer.
